Mastering the Risograph Color Mixer

Mastering the Risograph Color Mixer

The Risograph Brush and Texture Kit has been winning hearts across the design and illustration community. What's not to love? The tantalizing textures, those delicate details, and those unique, oh-so-subtle imperfections.

But we noticed one problem.

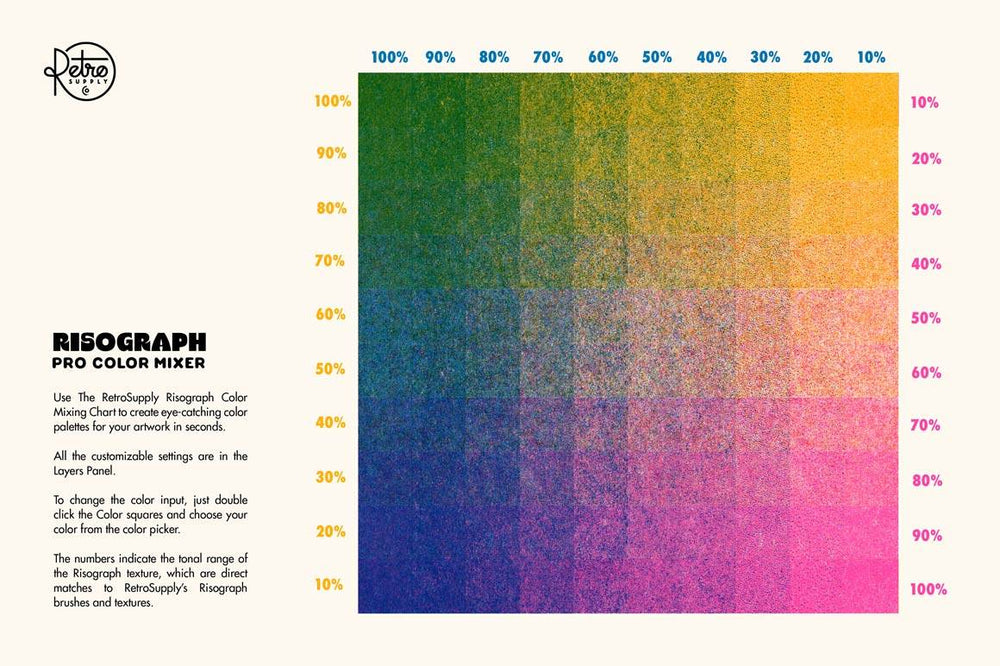
There was no way to quickly see how your color palette looks when your colors are layered. And a huge part of the magic if Risograph is the interaction of texture and color.

Get the Risograph Color Mixer FREE with your purchase of the Risograph Brush and Texture Kit or the Risograph Print Pack. Available for Procreate, Photoshop, Affinity, and Clip Studio Paint.

That's why we created the Risograph Color Mixer.

This nifty tool lets you input three colors and shows you a spectrum of 100 possible Risograph colors.

Imagine having a mini, magical Risograph color labratory at your fingertips. Just pop in three colors, and voila, you've got 100 color combinations.

But the real game-changer here is the way the Risograph Color Mixer captures those subtle textures and imperfections that make your work truly unique. It's like having a professional color chef, blending the perfect mix, with just the right amount of grain and tone.

  • Think about the advantages.
  • Time-efficiency
  • Consistency
  • An ocean of combinations
  • Visual accuracy

This tool really is a game changer for the pack. Using the Risograph Color Mixer you can easily cut your work in half!

Let’s delve into how it works (this is extremely simple but powerful).

Step 1: Choose and input three colors into the Risograph Color Mixer template

Pick three colors you'd like to use in your work and feed them to the Risograph Color Mixer. Just double click on the layers titled Color 1, Color 2, and Color 3 in the layer panel and input your colors in the Color Picker Panel.

The mixer does limit you to three colors but with Risograph-style art this tends to be enough and, if not, you can use the mixer on more than one set of palettes.

Step 2: Generate the color combinations

As you add each color into the template you'll see them display on your canvas. As soon as you input the second color you'll begin to see the color combinations and interactions you're going to achieve with the Risograph Brush and Texture Kit.

Step 3: View and analyze the generated color combinations

That's it, behold the spectacle of 100 new color combinations! In just a few seconds you can see all of the hues, textures, and those minute imperfections that make Risograph prints uniquely captivating.

Step 4: Experiment with different color combinations

It never hurts to explore more than one set of color options. Go back to step one, shake things up with a different set of colors. Pay attention to the unique way the textures and imperfections of the inks play off each other. Consider how these might look in your finished work.

Step 5: Utilize the generated color combinations for your design

Now that you have a set of colors you love it's time to start implementing them in your work. Use the corresponding percentage brushes from the Risograph Brush and Texture Pack and start coloring your artwork.

Tip: Save your Risograph Color Mixer palette out as a PDF or JPG so you can quickly use it in the future without having to recreate the color palette. In short time, you'll have your own personal library of color palettes saved!

Grab the Risograph Color Mixer Free

If you've got this far you can probably see how this template can give you incredible results and save you time.

Best of all, you can get the Risograph Color Mixer FREE when you purchase the Risograph Brush and Texture Kit or the Risograph Print Pack.

Just purchase either pack and you'll find the template in the download.

Grab it now and start bringing the magic of Risograph textures, layers, and colors to your work today.