In this tutorial, we’re going to teach you how to make a retro cereal box design using the iPad Pro, Procreate, your Apple Pencil and brushes from The Mid-Century Brush Pack for Procreate — Procreate brushes designed specifically to replicate the look and feel of the era.
Inspiration
Before starting this project, I had to look for a couple types of inspiration.
First, I looked up examples of vintage cereal boxes so I could capture that authentic retro feel. I love their big, bold colors and fun lettering styles.
Then, because I don’t think I’ve drawn a leprechaun since 3rd grade, I had to look for some examples of those.
Sketch
First, I start by sketching out my character. This goes through a few stages: one where I figure out how to draw a leprechaun at all, taking note of what makes him recognizable as a leprechaun, and then one where I bring more character to the base idea.
After that, I draw a loose thumbnail of what I imagine the whole cereal box might look like. With this, I’m just looking for the basics of where text will go and how the image might flow.
Now, on a larger page, using the references I’ve just created for myself, I sketch my box design.
Once this is looking how you want it, take a picture of it with your iPad. Make sure it’s as flat and well lit as possible. We’ll be using this to create our final piece.
Create Your Canvas
Just looking at the cereal boxes we found earlier, I can see that they range in size a bit but, they are all tall rectangles.
Let’s create an 8x10 inch canvas to replicate that shape and to allow us plenty of layers to work with in Procreate. If we go too big, the program will start limiting us with the amount of layers we can make and we want a lot of freedom to create plenty of layers with this type of full color design.
Import your sketch. Drag and stretch it until it looks about how you want it on the canvas. You can make some layout adjustments here too, if you need. I’ve noticed my cereal’s name should be a bit larger compared to the image. So, I use the selection tool to cut out and resize that area.
Go to your sketch layer’s properties. Turn down the opacity so you can use it as a guide for these next steps but it’s not too distracting.
Block in Your Forms
Create a new layer underneath your sketch layer. Using your sketch as a guide, fill in your colors as if you were doing a coloring book.
Draw an outline around your shape using the Perfect Gouache brush from The Mid-Century Brush Pack for Procreate. Then, drag your color from the upper right and drop it within the bounding lines of your shape. This will fill your shape with the selected color.
GET THE BRUSHES
A collection of 15 mid-century art brushes designed to create analog looking illustrations in Procreate.
Keep creating new layers for each color you are using. This will help you edit them and let you shade and add texture easier later on.
Shading and Linework
Beginning with our character’s face, let’s draw out some of the lines we made on our sketch to bring some more life to the leprechaun. Create a new layer over the peach layer so our lines can sit on top.
Use your finger to select the peach color of his face. Now click on that color we’ve selected in the upper right. This will bring up the color menu. In here, click on the classic color selection panel. Using this, select a color that is a much more saturated, darker version of the peach color we originally selected. This color is like a vivid red-orange.
Using our sketch as a guide and Perfect Gouache from The Mid-Century Brush Pack for Procreate as our brush, draw the lines that make up our leprechaun’s facial features. Do the same for his hands.
Now we’ll add some shading. Select the peach layer of the face and hands. Click the layer again to bring up its options menu. From this menu, select Alpha Lock.When this is turned on, we can only draw within the areas that already contain color in this layer. This is useful when adding shading because we won’t accidentally shade outside of our main shape and have to go back to erase a bunch. We are only adding shading to what already exists.
With alpha lock turned on, using the Dry Gouache brush, let’s begin shading. Starting very lightly, shade the bottom right portions of the leprechaun’s face and hands. This gives a sort of shadowed effect, making the upper left portions appear illuminated by the sun and the bottom right portions appearing within shadow.
Using the same brush, gradually add in the rosiness of his cheeks. Always start with light marks and gradually work in with harder, darker marks nearer to the lined edge to give the shading focus.
Continue doing this to each of your color form areas, bringing depth and detail only where necessary. Remember that his face and hands are the main points of focus. So, keep those as the most fully rendered areas. The rest of the image takes a back seat to those, so they don’t need to be much more than colored shapes.
Adding the Cereal
Well, “cereal”. I found a really nice looking picture of cat food online so, I’m going to use that in place of cereal.
Import your cat food image. Stretch and position it over the area you would like to fill with food.
To make your cat food this tantalizing green color, go to the upper left and click on the magic wand to bring up the Adjustments menu. From here, select Hue, Saturation, Brightness.
I played with the Hue slider until the cat food was the green color I wanted. Then, I boosted the saturation to amplify that sugary goodness.
Once your cat food is as beautiful as you want it, go to its layer options and select Mask. This will create a layer of all white attached to your cat food.
Click that white layer mask to bring up its options and then click Invert. This will make the cat food disappear and change the mask color to black.
Now, using the Perfect Gouache brush and the color white, draw on your mask layer where you would like the cat food appear. The masked image appears everywhere that you draw in white. You can draw in black anywhere you would like to erase to make it disappear again.
Using this method, I filled our pot of gold and the leprechaun’s spoon with cat food disguised as cereal.
GET THE BRUSHES
A collection of 15 mid-century art brushes designed to create analog looking illustrations in Procreate.
Lettering and Info Bubbles
Create a new layer for the cereal’s title lettering. Using our sketch as a guide, outline and fill all of the word “Clover” with green. I used a green that is much more vivid than anything else on the rest of the box. That will help it stand out better.
Click the Clover lettering layer to bring up its options. In the options menu, click Copy. Now, go to the wrench icon in the upper left to bring up the Actions menu.
From here, go to the Add portion of the menu. Now click paste. This will paste a replica of your Clover lettering as a new layer.
Move that layer beneath the original Clover layer. Select and move that layer so it is slightly off it’s original, creating a drop shadow to its lower left.
Go to the Adjustments menu in the upper left of Procreate and bring the brightness down on this layer so that it reads better as a shadow.
Using these same steps, but with the color yellow, create your “Crunchies” lettering and its drop shadow.
To add the text that is not hand drawn, simply go to your Actions menu in the upper left, go to the Add portion of this menu, and select Add Text.
Type any additional text you would like using this. You can also adjust the text’s font, size, color and anything else from here. Create backing bubbles or sunbursts underneath your text layers if you need them to pop out more. Using this, I added some nutritional info and a free prize inside.
Old Cardboard Texture
To bring this whole piece together, let’s add an aged paper look to it all.
Using the Actions menu in the upper left, insert a photo of aged paper, like one from the Paper Boy pack. Stretch and resize this so it fills the whole canvas.
Bring this layer above all of the others. Go to the layer menu and click the N that’s next to that layer’s check mark. This brings up the layer’s blending properties. Change this layer’s blending style to Multiply. Adjust the layer’s opacity so that the aged paper effect is as strong or light as you’d like it to be.
GET THE PAPER
A collection of high-resolution paper textures designed to make your final artwork look like it's living on the original source material.
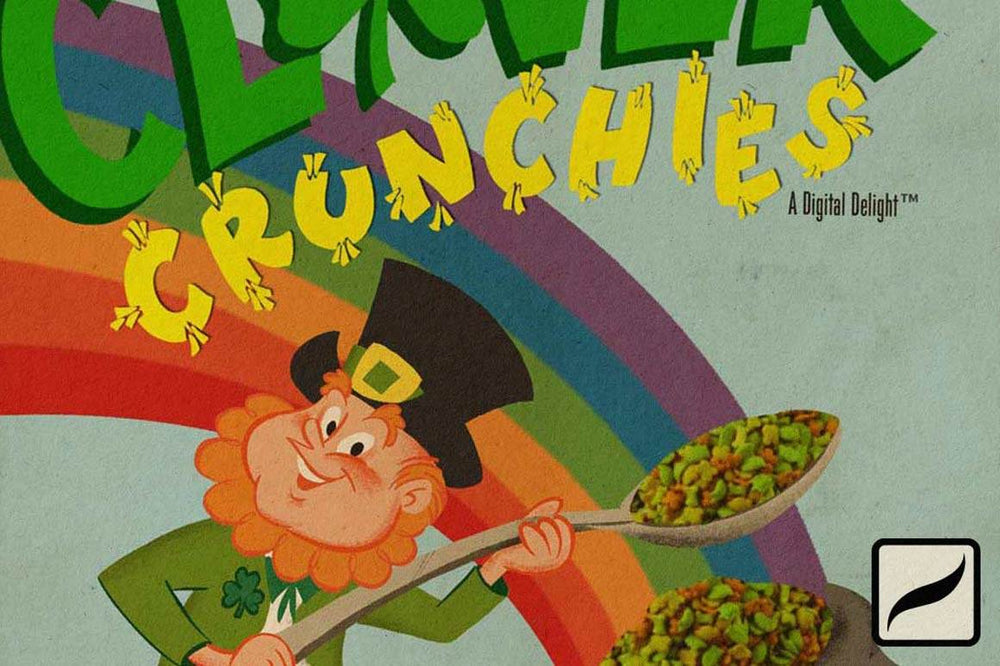
That’s it! Now we’ve created an authentic looking vintage cereal box using Procreate, some quick tricks and some RetroSupply brushes true to the era.
More Mid-Century Inspired Products from RetroSupply
ABOUT THE ARTIST
Robin Banks is a self-taught artist and illustrator living in Salt Lake City, UT.
Robin has been a RetroSupply resident illustrator since 2019.
Their work can be found on Instagram @ramenbanks or on their web store robinbanks.bigcartel.com