Have you ever wondered how me make our no-stretch brushes for Adobe Illustrator?
I’ve been spent the last few months creating a process for making no-stretch pattern brushes for Illustrator and the result has helped me create packs like The Dead Pen Brush Pack, Black Magic Halftones, and, our most recent pack, Cross Country Cross Hatchers.
During the countless hours I have spent on these packs, I’ve discovered some shortcuts and tricks along the way.
In this tutorial you're going to learn:
- How to make no-stretch pattern brushes in Adobe Illustrator.
- How to build a seamless diagonal line pattern using simple shapes and the Pathfinder tool.
- How to roughen clean lines to make them more textured and organic.
Let me walk you through the same process I used to make the Cross Country Cross Hatchers.
Step 1. Prepare your art board
Before we begin, I recommend turning on your Grid. This will help you be more precise when making the brushes and will keep everything in correct proportion.
Just go to View> Show Grid. Make sure that you also have Snap to Pixel and Snap to Point checked off below.

Step 2. Create seamless and 45° angled diagonal lines
To begin, we will need to create evenly spaced lines at a 45 degree angle. This will give us the bones for our diagonal cross hatching pattern brush.
Start by making a square. I use my art board grid as a guide.

Create your vertical line using the rectangle shape tool. Rotate it 45 degrees by holding down Shift and rotating once to the right.
Align the shape to the top left left corner of the square by dragging the middle section of the rectangle to the top of the square until Intersect appears. Release the shape.

Duplicate your shape and align it to the bottom right corner of the square. I hold down Option + Shift and drag it to the other corner until “intersect” appears and the middle of the shape is aligned with the corner.

Now we need to make a blend of the two shapes. Go to Object> Blend> Blend Options. Choose Specified Steps and put in an odd number.
If you want more lines, you will have a larger number, if you want there to be less lines, put in a smaller number.

Expand your blend by going to Object> Expand. Choose Fill and Object in the pop up box and click Ok.

Crop the lines with your square. Make sure your square is in front of your lines by going to Object>Arrange>Bring to Front or Shift+command+] Select all of the lines and your square and choose Crop in the Pathfinder menu.

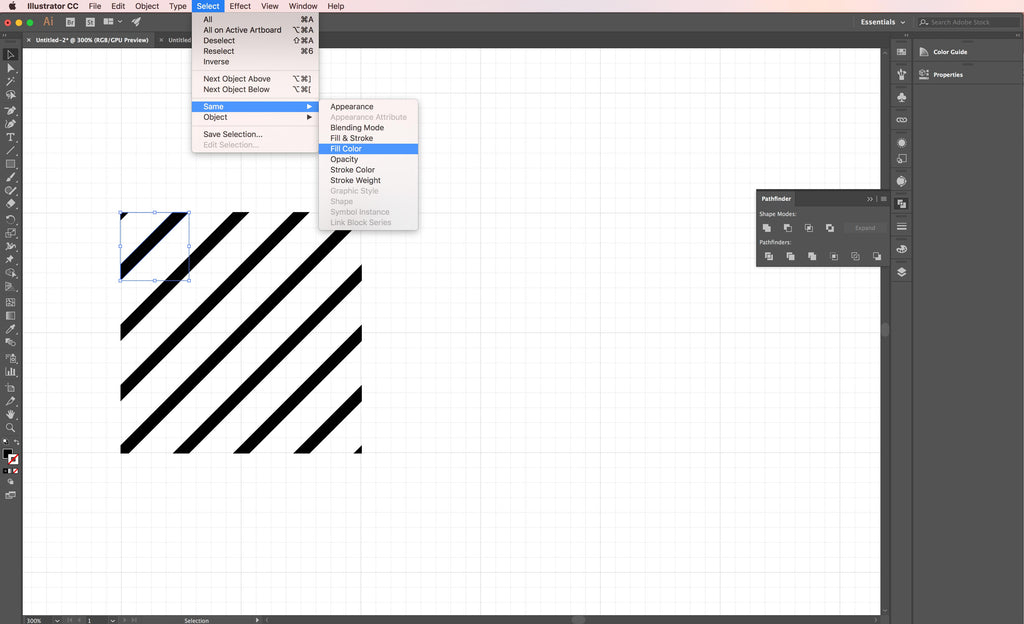
When we cropped our lines, shapes were created in between our lines. We want to get rid of these. Ungroup your lines by going to Object> Ungroup. Select one of the black lines and go to Select>Same>Fill color.

Drag this selection down. Click your mouse and hold it down while dragging over the area the lines used to be and it will select these shapes. Delete the shapes.

Select all of your lines. Duplicate them by holding Option+ Shift and dragging to your right. Make it align to the edge of the original square of lines.

Select the lines from both squares and click Unite in the Pathfinder menu. Now you will have a rectangle of lines.

Step 3. Roughen your lines
This is the point at which I want to roughen these lines to make them more organic and textured.
I start by selecting all of my lines and going to Effect> Distort & Transform> Roughen.

Check the Preview box in the bottom left corner so you can see how the settings effect your lines. For a more subtle roughened look, make the Size 1-2px and check the Absolute and Smooth options. Drag the slider around on the Detail to see how rough it can get. I usually never go above 12.

Expand your lines by gong to Object> Expand Appearance.

I want to further roughen my lines by manually erasing parts with the Eraser Tool. For this particular one, I want the lines to appear to fade at the top, so I will erase away part of the lines.

Step 4. Start cropping your lines into pieces for the brush
Now it's time to start breaking this down into parts for the seamless pattern brush.
To begin, we need to crop off the right and left ends of the lines. Using the guide, draw a rectangle around your lines; ones which includes the top and bottom on the lines on the inside but excludes the right and left ends of your lines. Make sure your rectangle has no stroke and no fill.

Select the rectangle and lines and choose Divide from the Pathfinder menu. Then, ungroup by going to Object> Ungroup.

Select the outside sections and drag them away. We will come back to these later. Drag the main section to a new spot to work.

Step 5. Make your lines seamless
We want this main part of our brush to be able to repeat without showing any seams or line breaks.
Select all of your lines and duplicate the rectangle by holding down Option + Shift and dragging the lines to the right of the original.

Get your spectacles out people! We are about to get down to details now.
Zoom in as much as you can (Command+ +). With the Direct Selection tool, drag the anchor points while holding the Shift key to make them align to the left side lines. Make sure that you are only adjusting the right side. Make appropriate adjustments to curves and delete any anchor points that create sharp curves.

Delete any anchor points that appear in between the two edge anchor points.

Select the side you did not adjust (in this case, the left side) and delete it.

Draw a rectangle around the lines and make sure the sides of the rectangle intersect with the ends of the lines.

This will be the container for your lines. The path of your brush will run along the middle of this rectangle. You now about the main part of the brush done.
Step 6. Make your line ends seamless with the main part of the brush
Drag one of the ends of your lines down to intersect with the side of your rectangle. Draw a rectangle around these pieces. The top and bottom will need to line up with the top and bottom of the larger rectangle around the main part of the brush. This is your container for the ends of your brush. Group the ends and the rectangle.

Zoom in and, with the Direct Selection tool, move the anchor points to align them with the edge anchor points of the larger lines.

Repeat for the ends of the other side. Don’t forget to draw your container rectangle and group it with the ends.

Now you are done with your brush ends!
Step 7. Build your brush in the brush panel
Now it’s time to create your brush. Drag the main part of the brush (the rectangle of lines and container rectangle) into the Brush Panel. Choose Pattern Brush.

In the Pattern Brush Options pop-up, choose Auto-Slice for the corers from the drop down menus.

Then Choose Approximate Path and Tints. Press Ok.

Now you need to add your ends to your brush. Select the left end of your brush and drag it into the 5th segment in your new brush row while holding down Option. Release your mouse when the green plus sign appears. Press Okay on the Pattern Brush Options pop-up.

Select the right end of your brush and drag it into the 6th segment in your new brush row while holding down Option. Release your mouse when the green plus sign appears. Press Okay on the Pattern Brush Options pop-up.

That’s it! You now have a no-stretch cross hatching pattern brush.
Don't have time to make your own brushes?
If you're looking to save time, we've got a pack of 216 cross hatching brushes and 48 cross hatching swatches that are going to save you A LOT of time and effort! Grab the Cross Country Cross Hatchers here!

